Showing posts with label Hirst Arts. Show all posts

Monday, December 28, 2015

Frostgrave Table Finished

So I had a bit of extra time over the Christmas holidays and managed to finish off the Frostgrave table that was sitting around, begging to be finished.  Since the last time I posted I moved one of the roads to make the board more nicely spaced, added the sand and some rubble to the gutters.  Finally, I applied paint!


The cobbles were painted dark grey up to white with drybrushing, and the show started as a medium grey and was painted up to white.  The gutters were first painted dark grey, then brown, then dark blue, light blue, and white.  They were given a gloss coat to simulate the shiny ice and water that fills them.

I hope you like the table, I am eager to try it out as a finished, rather that WIP, piece soon!

Sunday, September 13, 2015

Frostgrave Table WIP #2

So, after some suggestions and some thinking, I decided that a recessed gutter would look better than a raised curb for this table.  It would also be more practical as the curb could interfere with some terrain placement.

Additionally, I replaced several areas of blocks with some foamcore I had laying around.  I am planning to cover some large swathes of the cobblestone in snow drifts, so there is no reason to cover up the completely good tiles I worked so hard to cast.  This has the added bonus of leaving me more leftover tiles to make some board expansions in the indefinite future.

Any other suggestions?  I think I will start gluing down the tiles this week, time (and glue permitting)!


Also, I forgot to add, the snow will be made using regular PVA glue and fine play sand.  It will then be painted appropriately along with the rest of the table.  Should work out much cheaper than purchasing enough snow flock to cover a table, considering I already have the sand.

Thursday, September 10, 2015

A table for Frostgrave

So Frostgrave is the new thing it seems.  For those unfamiliar, it has a big following over at the Lead Adventure Forum, even with its own section. It is a fantasy skirmish game, set in a magical, frozen ruin of a city,  Seems pretty self explanatory.  I played a game with a buddy a couple weeks back, and we both really liked it.  We played on a 3x3 table, but both thought it might be more fun on a cramped 2x2 board.  This got me to thinking about all the unused hirst arts pieces I had laying around...

After a bit of foam cutting and experimentation, I came up with this:


The pieces are not yet glued down... I am still torn as to whether I should keep the raised border around the cobbled street.  I am considering removing the bigger blocks to leave a sunken gutter rather than a raised curb around the street tiles.  Any suggestions?  I think I might need some more glue...

Friday, March 21, 2014

Clan Kraven's additions

I have made a bit of progress on my rats.  Firstly, I based all of the old figures I had painted years ago.  I find it quite striking the difference that a bit of sand and static grass can make.  I would say they almost look presentable, lol.  The basing job for most of them was quite simple - glue some sand, paint it brown/grey shades, glue on some yellow/dead grass.  A few if them had some other bits added - broken balsa wood, hirst arts ruined bricks. 

My assassin adept got a bit better treatment though.  I used a hirst arts barrel, and pinned him in a jumping pose from the barrel.  It looks more assassin-esque if you ask me. I just hope my mordheim opponents don't insist that he can't hide behind a low barrier now!


In addition to this, my wizard's spell is "Children of the Horned Rat" which grants up to 3 giant rats to your team at the start of the battle.  I figured this warranted painting up a few giant rats, as they will be included in each match.  I chose to paint mine in a white scheme, since they are "magical"


Next up, my warband has played a few battles and accumulated a few coins, so now they can afford a fearsome rat ogre!  This guy is still a WIP - some more highlights are required, and the basing is not yet finished.  Nevertheless, I am pleased with him thus far:


I hope you enjoy them!  Gaming night is tomorrow, so I look forward to trying out the big beastie.


Monday, August 12, 2013

Lead Adventure "Death Bell" Cannon

I have a nice little surprise for you!  No, it is not pictures of the completed reiksguard unit (don't worry, its finished, just actually need to take the pictures).  I finished a cannon for my Oldhammer army.  This is no ordinary cannon, however.

Lead Adventure Miniatures  recently released a new cannon for their Bruegelburg range.  This one, however, was built by the revolting peasants of Schweinstein.  It is a repurposed bell, and it absolutely fantastic.  Here is a nice picture of the sculpts:


Now here is my take on it with a lick of paint:

A total blast to paint, the bell was beautifully detailed and took to some verdigris staining very well.  These minatures look so nice, I decided they also needed a scenic base:


The base was from 4ground, and I used some miscellaneous Hirst Arts blocks, a GW fence, and then the usual sand, flock, tufts, and flowers.  It really brings the piece to life and helps show off the immense character of these figures.

My only criticism of LAM is that some of the faces lack a certain amount of character, with somewhat sharp defining lines.  Though that is not all of them, and much of the time you can make up for it with a good paintjob.  Hope you like the cannon, I would recommend it to anyone.


Sunday, January 20, 2013

DeepWars Ruin Finished!

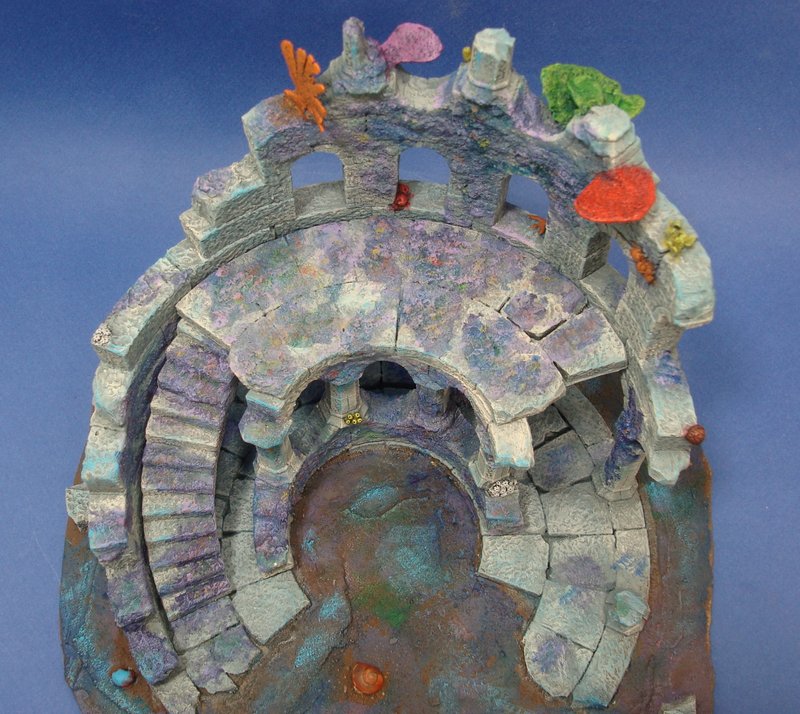
I took some time this weekend, and finally finished the paintjob on my sunken ruin for DeepWars.  I am quite pleased with the result, although I had thought of trying one last wash with a darker grey to tone the colours down a bit.  For now I will likely not, but if you think it is a bit too bright, I would appreciate any suggestions.

The painting was fairly straightforward - I started with a base of flat latex exterior house paint.  I mixed black and white to the colour I wanted.  Subsequent layers had differing amounts of cream added.  After I was satisfied with the stonework, I painted the sealife.  Many different shades of purple, pink, green, red, blue, yellow, orange, green (did I miss any, lol?) were applied to give it a sense of diversity.  Mostly it was a base of purple, and other colours drybrushed on.  Although I did apply some blue washes to the whole structure.  The sand was done as my gaming mat - a base of brown with purple, green, and blue, followed by another drybrush of brown.  Final touches were applied with bright blue-green to simulate the shining effect of the ethers in the Shadow Sea.

Onto the pictures!  We will start with overall shots:


Next, a few closeups of the encrusting life:


A better view of the stairs and platform:


Top view with the corals:


And a final parting shot with my painted miniatures so far - the Dagathonan Salvager and the newly finished Draconid Shaman (who will get his own blog post shortly!)


I am very pleased with the way this piece turned out.  I think it has a nice shallow reef feel to it, and the plaster/glue trick really looks like coralline algae!

As always, comments and suggestions welcome!

Monday, January 7, 2013

DeepWars Ruins update

Over the holidays and the past few weeks I made some progress on my ruined building for DeepWars.  I am pleased to say that it is now ready to be painted!

First, I added some encrusting growth onto the structure using a pretty simple method.  I spread carpenter's glue where I wanted the encrusting life.  Then I sprinkled on dental plaster to get it to stick to the stone.  I shook off the excess.  Make sure you do not touch it with your fingers!  You will flatten it and ruin the effect.  I then finally used a water mister to spray a fine mist of water to wet the plaster, allowing it to fuse to itself and the glue.  I did this in several steps - I would spray a fine mist, then come back 20 minutes and repeat that several times.  Wait until a few hours have passed before touching the plaster so as to avoid flattening it.

Next, I added some plating and branching corals to the top of the structure.  These used yogourt container plastic as a base, with greenstuff for details.  Pretty simple and self explanatory.

Finally, I based it on a piece of MDF board with some sand and rubble.  Hope you like it!


Closeups of the corals:


Some closeups of the encrusting plaster:


Finally, I had an idea to make coral heads to decorate this and other underwater terrain.  Ever see the sea sponges in the paint section at your local hardware store?  The ones used to make cool patterns on your wall?  Well, those are made from actual sea sponges, which when cut into smaller pieces, make for easy and passable corals heads for 28mm.  Here are some sample pieces, cut and dipped in a mixture of craft paint, water, and PVA glue.  They still need some shading and highlighting, but you get the idea!

As always, comments and suggestions welcome!


Sunday, December 16, 2012

DeepWars Underwater Scenery

In anticipation of receiving my starter force for DeepWars from my local supplier, I decided this weekend to put together a piece of scenery.  I used blocks from Hirst Arts mold #65 - the ruined tower.  From there, I made just the base tower from the website instructions.  It turned out quite well, I should think.  However, this being a game based underwater, I decided it needed to have a bit more sealife included.  Work is not finished yet, but I managed to sculpt on some sponges, barnacles, and other encrusted sealife with some greenstuff.  I hope you like it, as I still need to sculpt more.


A closeup of the barnacles and sponges on the front arch:


Back view of the ruin:


Closeup of the sea life:


In addition to sculpting some more details, I also plan to add a thin layer of plaster over parts of the building to represent calcareous encrusting organisms, such as coralline algae and some small corals.  That will likely be done using some PVA glue and water, details of which I will post later.  I want it to have a vague semblance to something like this random internet picture of encrusting reef life:

Hope you like it!


Saturday, June 2, 2012

First Post!

After posting my efforts on several forums across the interwebs, I decided to bring most of my madness to one site.  So, hopefully I will have the time to keep things busy around here.  Feel free to comment on any of my work!

I will start things off with my current project: a Nipponese Junk for my current warhammer campaign.  Right now I am playing in an online WFB campaign set in the Karibbean: link

My character is a Nipponese samurai/ronin, and he needed a boat.  I found myself a nice little junk on ebay for pretty cheap:

I got it, and assembled it a couple weeks ago:


Width was somewhat disappointing, only about 55mm so I can only fit 2 20mm bases side by side, but for the price it works well.

Then, this past week I got back into casting my hirst arts molds (I now have a dedicated workshop!) and while casting the blocks for a castle/fort, I made use of some extra to cast some more details for the ship, in addition to modifying a few other parts:


Its not done yet, but so far I like the progression.  The clay tile roof is one of my favorite hirst arts molds.  That and the cavern accessory mold!  Pure awesomeness right there!  I will have to post more of my hirst arts adventures in the future.