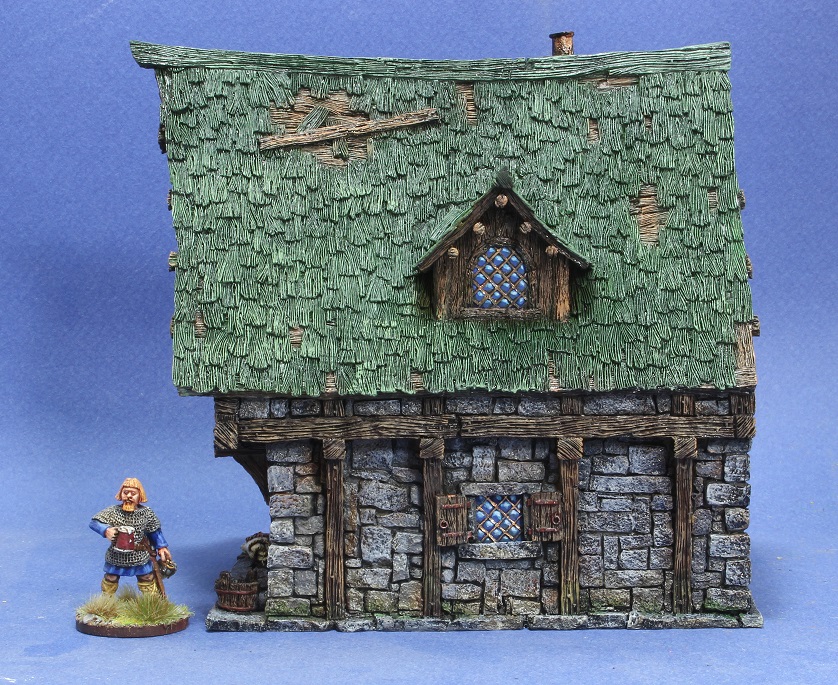
A little bit more progress this past month. This beauty had been sitting mostly finished on the painting desk, and I found the time to finish it. Got a bit of motivation from our local gaming group who started a monthly painting challenge!
The photos are a bit overexposed, but I hope you like them anyway!
One day I hope to have a table full of these buildings painted up. I'll get there someday ;)
Showing posts with label Tabletop World. Show all posts
Tuesday, August 1, 2017
Monday, May 15, 2017
Tabletop World Cottage
Recently, Tabletop World held their online painting contest. A nice little event to get people to show painted examples of their product in exchange for a 20% off discount off their next order. Or, if you have time and ambition, to possibly win a prize. I chose the first reason to participate!
I started painting up the cottage and the townhouse, but only finished the cottage in time for the deadline (surprise, surprise). The townhouse is almost finished, but life seems to keep me busy enough that painting tends to come along rather slowly. I hope you enjoy the cottage though, these kits really paint themselves. Very well defined details that take really well to washes and drybrushing!
Now, I just have to finish the last of the drybrushing for that townhouse and post it up here...
Wednesday, April 2, 2014
Tabletop World Merchant's House
Tabletop world recently ran a painting competition. While I had visions of an elaborate diorama, real life with young children saw me complete but a single building. It was nice to get the building painted though, and it will make a nice addition to my table, along with the windmill which I have also finished.
As I said before, these things practically paint themselves... very enjoyable. I have not fully finished the interior yet, but the exterior is pretty much finished.
You can see my entry along with many more over at the Tabletop World facebook page. Feel free to "Like" my photos in the contest. Though truth be told, there are many entries more skilled than mine. I am still happy with the results, however.
Friday, September 13, 2013
Dipped Windmill Finished
I have now finished the windmill upon which I was experimenting. I am quite pleased with the results, though I imagine that the quality of the piece would make it hard to get a bad finish. This tabletop world terrain is simply mind-blowing.
Anyway, after a bit more painting, and dipping, and pinning and gluing, I had the windmill 'finished' to the point of requiring only some touchups and a coat of matte varnish.
That would work well in a pinch, no? While it looks nice, I found the metal was too shiny for something left out in the elements, and the stones needed some weathering and differentiation of colours. A healthy number of stones were given a wash with a mix of brown and red ink. The metal was given a similar was to simulate oxidation. I then washed the bottom bit of the windmill with green and brown to simulate moss and moisture growing up from the ground. Lastly, a drybrush of the stones to bring out the detail, as well as the blue shingles, and a few touchups here and there give us the finished product. It was sealed with a spray of Testors dullcote.
Lastly, we shall give a parting shot with the wizard of the tower (should we just call him the miller or something?) with a landsnkecht mercenary.
I hope you enjoy the photos. It would be nice to use all this stuff in a game for once. One day...
Tuesday, September 3, 2013
Recipe for dipping... and terrain
I am sure there are a few folks out there who have used future floor polish to make washes and stains for miniatures in the past.
It is an acrylic floor polish which has magical properties to flow into every recess of a miniature, while leaving only a small amount on the raised detail - perfect for shading details. It dries to a hard, glossy finish which will require some matte varnish to overcome, but it typically gives a good result.
As for the recipe in question, here it is:
1. One bottle of Clear Floor Finish.
2. Black India Ink
3. Brown India Ink
4. A Tap
5. A container with a VERY tight lid (I would recommend a large mason jar)
Mixing intructions:
1. In the Mason Jar put in 150 mL of Future Floor Finish.
2. Add 30 mL of black ink, and 30 mL of brown ink. Then, add 60 mL of water.
3. Mix well and let it sit (Until all the bubbles are gone).
After that, you use it as you would any other wash or dip - flow it onto a basecoated miniature for instant shading. It won't win you any painting awards, but it will help you get good tabletop standard miniatures out quickly. Just make sure not to forget the matte finish!
For my recipe, I could not source brown India ink locally, so I used an acrylic ink instead. So far my house has not burned down, and all seems to be fine. Except that the brown pigment seems to settle out a bit on the bottom.
For my first victim, I started painting my Tabletop World Windmill. I cheated a bit, in that I primed the main building grey, and the roof brown. From there, it was a heavy drybrush of light grey for the building, with brown, blue, and silver for the wood, windows, and metal, respectively. For the roof, I drybrushed two shades of blue on the shingles, and two shades of brown on the wood. The metal was done in silver. Then I applied the wash, and that is as far as I have gotten (no matte finish yet). I might do one more round of drybrushing, and a bit of inking on the bricks, but the building is mostly done, save for the sails.
Not bad for minimal work, IMHO. Here you can see it with a few Oldhammer friends:
It certainly helps that the Tabletop World scenery is top notch. This stuff practically paints itself.
Subscribe to:
Posts (Atom)