Saturday, January 26, 2013

Clal-Chk Scientist

For the next figure in my Scaly Horde warband, I painted the bizarre and complex At-Atck, Clal-Chk Scientist.  This was a challenging figure to paint for a couple reasons.  First, this odd insectoid is unlike any other figure I have painted, so common anatomical landmarks become useless when trying to define where one appendage/colour ends, and another one begins.  Secondly, the intricate details on this model means for picking out lots of tiny colours with a small brush, combined with lots of inking and washing to preserve colour contrast.


Luckily, Eric at Antimatter Games was able to describe the anatomy in a bit better detail.


Being some sort of bizarre insectoid creature, the Clal-Chk is encased in a chitinous exoskeleton.  Therefore, the chitin protects him while underwater, and all he needs is a breathing apparatus.  This is the gold/brass plating that covers his head and torso, while the arms and legs are his regular appearance.    His breathing apparatus is a symbiotic bio-lung, depicted by this tentacled beasty on his back with the tubes coming out of it:


I am quite pleased with the result, although this round of photos did not turn out as nicely as I had liked.  Maybe one day I will get a better camera than a point-and-shoot!  Here are a couple side views to get a better idea of the model:


 Thanks for stopping by, comments and suggestions are always welcome!

Monday, January 21, 2013

Draconid Sea-Demon Shaman

Here are the photos for my recently finished Draconid Sea-Demon Shaman.  This is my second model for the Scaly Horde faction in DeepWars.  This guy was much easier to paint than the Dagathonan, as I did not use any special patterns on the scales - just blocks of colours with your standard highlights and shading.


 The staff was particularly interesting to paint, as it contained a couple crystals and some engraving in the whale bone.  I added some light blue effects to simulate the glow from the engraved runes and the crystals, along with some reflected light on his arm:


Lastly, the skull in his left hand was given some glowing red eyes, with the glow extending out across its brow somewhat.


All in all, this figure was very fun to paint.  The details are very crisp, which makes highlighting quite simple.  My only grip with this figure is that the figure MUST be pinned to the base.  With only a small metal nub attaching it at the tail, this hefty metal figure would be falling off at any slight bump.  I added a nice length of paper clip, along with some greenstuff to keep it extra secure.  That's just the price we pay for the glorious heft of metal models! :)  Enjoy!


Sunday, January 20, 2013

DeepWars Ruin Finished!

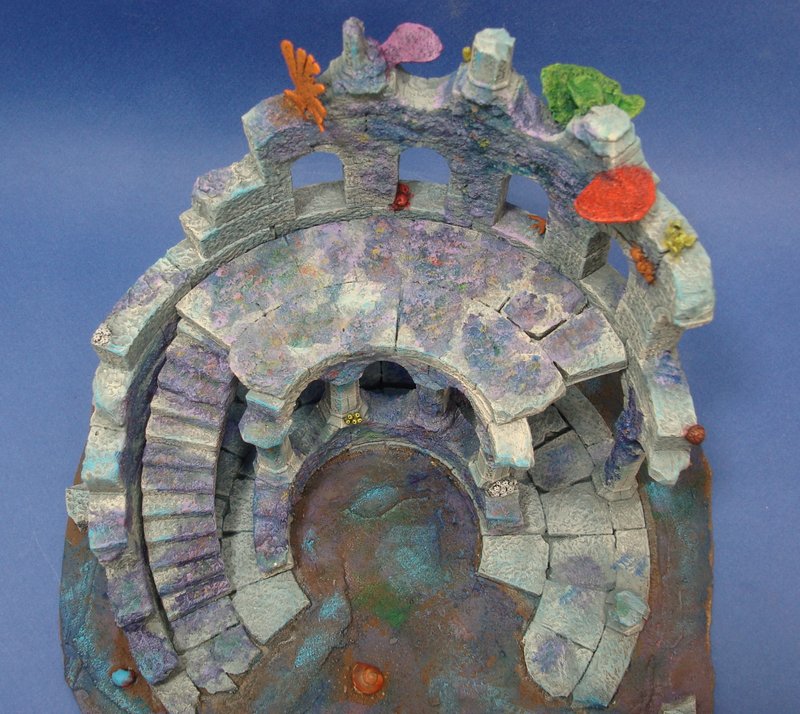
I took some time this weekend, and finally finished the paintjob on my sunken ruin for DeepWars.  I am quite pleased with the result, although I had thought of trying one last wash with a darker grey to tone the colours down a bit.  For now I will likely not, but if you think it is a bit too bright, I would appreciate any suggestions.

The painting was fairly straightforward - I started with a base of flat latex exterior house paint.  I mixed black and white to the colour I wanted.  Subsequent layers had differing amounts of cream added.  After I was satisfied with the stonework, I painted the sealife.  Many different shades of purple, pink, green, red, blue, yellow, orange, green (did I miss any, lol?) were applied to give it a sense of diversity.  Mostly it was a base of purple, and other colours drybrushed on.  Although I did apply some blue washes to the whole structure.  The sand was done as my gaming mat - a base of brown with purple, green, and blue, followed by another drybrush of brown.  Final touches were applied with bright blue-green to simulate the shining effect of the ethers in the Shadow Sea.

Onto the pictures!  We will start with overall shots:


Next, a few closeups of the encrusting life:


A better view of the stairs and platform:


Top view with the corals:


And a final parting shot with my painted miniatures so far - the Dagathonan Salvager and the newly finished Draconid Shaman (who will get his own blog post shortly!)


I am very pleased with the way this piece turned out.  I think it has a nice shallow reef feel to it, and the plaster/glue trick really looks like coralline algae!

As always, comments and suggestions welcome!

Friday, January 11, 2013

DeepWars Dagathonan Salvager

I finally got my first DeepWars miniature painted!  My first warband is the Scaly Horde, and as my first paintjob I chose the Dagathonan Salvager.  This fish-man was fun and challenging to paint - the small details really bring it to life, however.  I chose to paint a brown/orange pattern inspired by the fu-manchu lionfish, as seen in this internet photo:


I also assembled the model completely before beginning with the painting, which made things more difficult due to the pose of his arms and spear.  Nevertheless, I am satisfied with the result!  Unfortunately, the Dagathonan lacks the Fu Manch appendage, but it is still a lovely model!


The backpack was particularly tricky for me to get to a satisfactory colour.  After painting it brown initially, I changed it to more of a linen colour, using Foundry's Raw Linen palette.


Next up will be the Draconid Sea Shaman.  As always, comments are welcome!


Tuesday, January 8, 2013

Trees! More Trees!

One project which I have put off finishing for a while has been some forest scenery for my gaming table.  I used the 4ground forest bases link and some woodland scenic trees.  Basing was done with a variety of sand, flock, and grass tufts.


This is the large base, with a drunken 28mm Saxon warrior for scale.  He must have wandered in the wrong direction.  The nice thing about these tree bases is that the trees are on round 60mm bases that are removable:


Makes it easy for gameplay, and if you want to mix and match different trees, you can.  Speaking of different trees, I also finished two smaller stands of trees using the 4ground small tree bases.  Here is our hero in his continued wandering:


And with some of the bases removed...


The nice thing about the woodland scenic trees is that they have their own bases (which were glued to the MDF) from which the trees can be removed.  So, not only can I switch the tree stands around, I can remove trees from the bases and mix and match them if, for instance, I wanted to make a base with mixed deciduous and coniferous trees.  Unfortunately, our noble Saxon did not wander into such a mixed forest, and hence there are no pictures.  Hope you like them!

Monday, January 7, 2013

DeepWars Ruins update

Over the holidays and the past few weeks I made some progress on my ruined building for DeepWars.  I am pleased to say that it is now ready to be painted!

First, I added some encrusting growth onto the structure using a pretty simple method.  I spread carpenter's glue where I wanted the encrusting life.  Then I sprinkled on dental plaster to get it to stick to the stone.  I shook off the excess.  Make sure you do not touch it with your fingers!  You will flatten it and ruin the effect.  I then finally used a water mister to spray a fine mist of water to wet the plaster, allowing it to fuse to itself and the glue.  I did this in several steps - I would spray a fine mist, then come back 20 minutes and repeat that several times.  Wait until a few hours have passed before touching the plaster so as to avoid flattening it.

Next, I added some plating and branching corals to the top of the structure.  These used yogourt container plastic as a base, with greenstuff for details.  Pretty simple and self explanatory.

Finally, I based it on a piece of MDF board with some sand and rubble.  Hope you like it!


Closeups of the corals:


Some closeups of the encrusting plaster:


Finally, I had an idea to make coral heads to decorate this and other underwater terrain.  Ever see the sea sponges in the paint section at your local hardware store?  The ones used to make cool patterns on your wall?  Well, those are made from actual sea sponges, which when cut into smaller pieces, make for easy and passable corals heads for 28mm.  Here are some sample pieces, cut and dipped in a mixture of craft paint, water, and PVA glue.  They still need some shading and highlighting, but you get the idea!

As always, comments and suggestions welcome!